

Hi folks, this is my first UI Challenge post. Hope you enjoy it.
There is a rule that you should split a big problem, to some small subproblems, and fix them one by one. Then combine them as a solution to your problem. We apply this rule in our approach (you can apply it in other parts of your life).
In each design, there are some challenging parts (and for sure some non-challenging parts). First of all, we need to recognize the most challenging parts. Then we start to think about them to find a solution. At last, we start coding. You may plan your solution on a paper, or any method you feel comfortable with.
In this design, the most challenging part is the cinema’s screen (the curved blue line).
Okay, let’s start by thinking about it. The easiest way is to ask your designer to give you an image that contains the blue line and the glow. Then you can put it in your app without any coding. But what if you want to animate the glow? Or what if you want to make a small change on it like changing the thickness of the line? you have to ask the designer to give you a new image.
Fair enough, we need to implement it by coding. Let’s do it.
We must use CustomPaint to draw the line (I assume you are familiar with CustomPaint, CustomPainter, and Canvas. Otherwise, There are a lot of great tutorials out there, just google it)
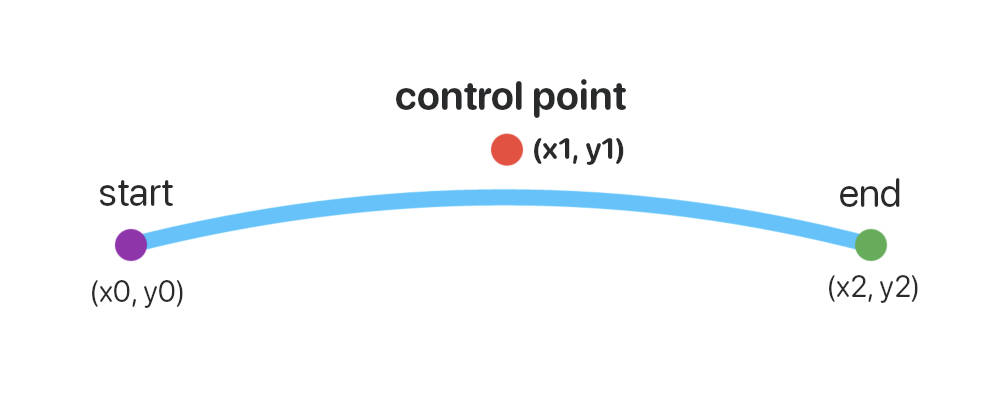
1. Curved Line Using Path.quadraticBezierTo
To have a curved line, we can use Path.quadraticBezierTo(x1, y1, x2, y2) method. It draws a line from where the path is to (x2, y2), using (x1, y1) as the control point of the curved line.
Suppose the last position of the path is the purple point (we can set it by moveTo() method) and the second point of the line is the green point.
Now we can handle the curvedness of the line using the control point (the red one).
  @override
  void paint(Canvas canvas, Size size) {

    final point1 = Offset(0, size.height / 2);
    final point2 = Offset(size.width , size.height / 2);
    final controlPoint = touchedPoint;

    Path linePath = new Path();
    linePath.moveTo(point1.dx, point1.dy);
    linePath.quadraticBezierTo(controlPoint.dx, controlPoint.dy, point2.dx, point2.dy);

    canvas.drawPath(linePath, linePaint);

    canvas.drawCircle(point1, 8, Paint()..color = Colors.purple);
    canvas.drawCircle(point2, 8, Paint()..color = Colors.green);
    canvas.drawCircle(controlPoint, 8, Paint()..color = Colors.red);
  }
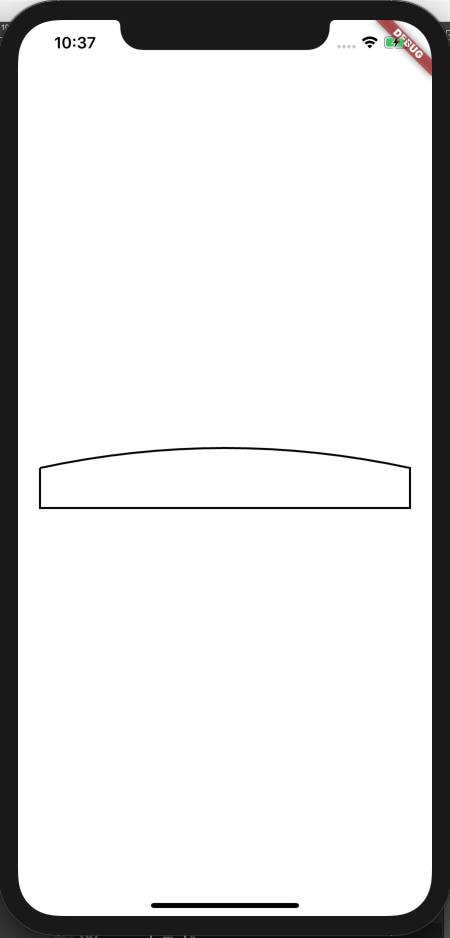
Okay, now we want something like this:
We used x1 => (end.x - start.x) / 2, and y1 => -40 as our control point coordinates. Now we have an argument for the height of our curved line (in fact we lifted line by -20). It means we should have our curveHeight argument and multiply it by 2 whenever we want to use it in canvas coordinates.
@override
  void paint(Canvas canvas, Size size) {

    final point1 = Offset(0, size.height / 2);
    final point2 = Offset(size.width , size.height / 2);
    final controlPoint = Offset((point2.dx - point1.dx) / 2, (size.height / 2) - 40);

    Path linePath = new Path();
    linePath.moveTo(point1.dx, point1.dy);
    linePath.quadraticBezierTo(controlPoint.dx, controlPoint.dy, point2.dx, point2.dy);

    canvas.drawPath(linePath, linePaint);
  }
2. Curved Line Gradient (or Glow)
Okay, we have our curved line. Now let’s implement the gradient (or glow) below it.
We need a path of the area below our curved line (we have the curved line in our linePath variable). Something like this:

To make this area, we are supposed to use our linePath as a base for our new path. Then we continue it through 3 steps to make our desired shape like the image below (let’s hard code the gradientHeight as 40):
Fair enough, let’s implement the area.
@override
  void paint(Canvas canvas, Size size) {

    final point1 = Offset(0, size.height / 2);
    final point2 = Offset(size.width , size.height / 2);
    final controlPoint = Offset((point2.dx - point1.dx) / 2, (size.height / 2) - (curveHeight * 2));

    Path linePath = new Path();
    linePath.moveTo(point1.dx, point1.dy);
    linePath.quadraticBezierTo(controlPoint.dx, controlPoint.dy, point2.dx, point2.dy);
//    canvas.drawPath(linePath, linePaint);

    Path glowAreaPath = Path.from(linePath);
    glowAreaPath.lineTo(point2.dx, point2.dy + 40); // step 1
    glowAreaPath.lineTo(point1.dx, point1.dy + 40); // step 2
    glowAreaPath.lineTo(point1.dx, point1.dy); // step3

    Paint glowAreaPaint = Paint()
      ..style = PaintingStyle.stroke
      ..strokeWidth = 2;

    canvas.drawPath(glowAreaPath, glowAreaPaint);
  }
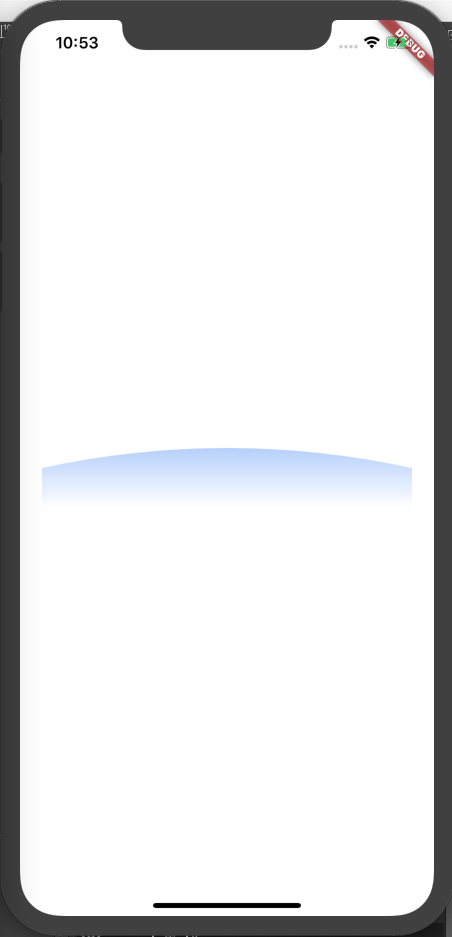
Yay! We have the area in our glowAreaPath variable, and now we can draw everything in it. For example, we can draw a solid color as shown in the image below:
@override
  void paint(Canvas canvas, Size size) {
    ...
    Paint glowAreaPaint = Paint()
      ..style = PaintingStyle.fill
      ..color = Colors.redAccent
      ..strokeWidth = 2;

    canvas.drawPath(glowAreaPath, glowAreaPaint);
  }
What about the gradient? Paint.shader is our rescue!
We can use a LinearGradient in our glowAreaPaint variable to draw it instead of the solid color we chose before:
@override
  void paint(Canvas canvas, Size size) {

    Paint glowAreaPaint = Paint()
      ..shader = ui.Gradient.linear(
        Offset(size.width / 2, (size.height / 2) - curveHeight),
        Offset(size.width / 2, point1.dy + 40),
        [
          Colors.blueAccent.withOpacity(0.4),
          Colors.blueAccent.withOpacity(0)
        ]
      );

    canvas.drawPath(glowAreaPath, glowAreaPaint);
  }
Okay, let’s bring back our curved line to finalize our job (also we can take out some hardcoded values as arguments, like the gradient color, or the gradient height). Also it’s time to set our background a dark color 😎😎
@override
  void paint(Canvas canvas, Size size) {

    Paint glowAreaPaint = Paint()
      ..shader = ui.Gradient.linear(
        Offset(size.width / 2, (size.height / 2) - curveHeight),
        Offset(size.width / 2, point1.dy + 40),
        [
          Colors.blueAccent.withOpacity(0.4),
          Colors.blueAccent.withOpacity(0)
        ]
      );

    canvas.drawPath(glowAreaPath, glowAreaPaint);
    canvas.drawPath(linePath, linePaint);
  }
Okay, we have implemented the Curved Line Gradient, you can now try it out in DartPad.
Let’s go to the next step, the seats grid!
3. Seats Grid
In my opinion, it is not as complicated as previous challenges. We can combine some Columns and Rows to achieve that.
class SeatsGrid extends StatelessWidget {
  final int rowsCount = 8;
  final int columnsCount = 17;

  @override
  Widget build(BuildContext context) {
    final cell = Container(
      margin: EdgeInsets.all(4),
      width: 12,
      height: 12,
      color: Colors.lightBlue,
    );
    final columns = List(columnsCount).map((columnIndex) => cell).toList();
    final rows = List(rowsCount)
        .map((rowIndex) => Row(
              children: columns,
              mainAxisSize: MainAxisSize.min,
            ))
        .toList();

    return Column(
      mainAxisSize: MainAxisSize.min,
      children: rows,
    );
  }
}
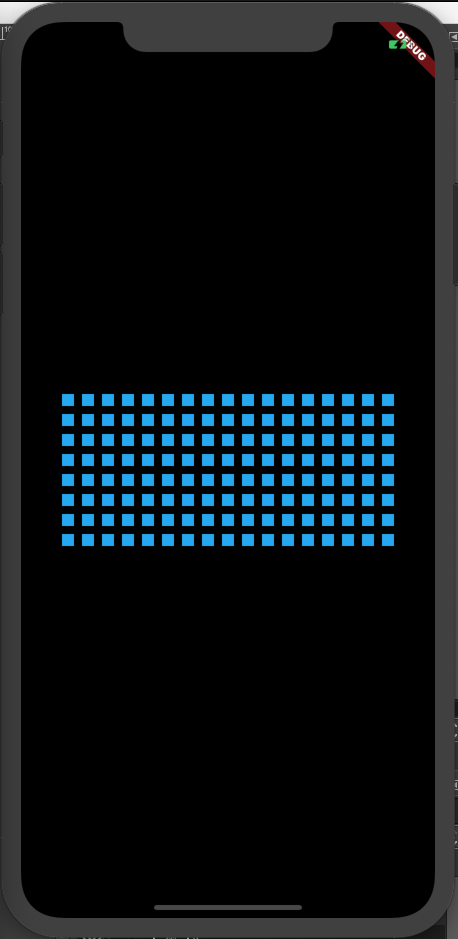
Okay, now we want to handle the seats’ state. There should be four states: available, selected, reserved, and one extra state for none (to hide a seat). We can have a 2D array to keep seats’ state. Let’s define an enum for SeatState, and fill a sample 2D array for our design:
enum SeatState {
  Available,
  Selected,
  Reserved,
  None,
}

List<List<SeatState>> getSampleSeats() {
  const int none = 0, available = 1, reserved = 2, selected = 3;
  return [
    [0, 0, 1, 1, 1, 1, 1, 1, 1, 1, 1, 2, 1, 1, 1, 0, 0],
    [0, 1, 1, 1, 1, 1, 1, 1, 1, 1, 1, 2, 1, 1, 1, 1, 0],
    [1, 1, 1, 2, 2, 1, 2, 2, 1, 2, 2, 1, 1, 2, 1, 1, 1],
    [1, 1, 1, 1, 2, 1, 1, 1, 1, 1, 1, 1, 1, 2, 1, 1, 2],
    [1, 1, 1, 1, 2, 1, 2, 2, 2, 2, 2, 2, 1, 1, 1, 2, 2],
    [0, 1, 1, 2, 1, 1, 3, 3, 1, 2, 1, 1, 1, 1, 1, 1, 0],
    [0, 1, 1, 1, 1, 2, 2, 2, 2, 2, 2, 2, 2, 1, 1, 1, 0],
    [0, 1, 1, 2, 1, 1, 1, 1, 2, 2, 2, 2, 1, 1, 1, 1, 0],
  ].map((row) => row.map((columnNumber) {
            SeatState state;
            switch (columnNumber) {
              case none: state = SeatState.None; break;
              case available: state = SeatState.Available; break;
              case reserved: state = SeatState.Reserved; break;
              case selected: state = SeatState.Selected; break;
            }
            return state;
          }).toList())
      .toList();
}
Now we can get our sample using getSampleSeats() function. Let’s write a function to make each individual seat cell UI based on the given SeatState (It makes a box-like Container with different color and styles based on each SeatState):
Widget makeSeat(SeatState seat) {
    double size = 12, margin = 4, radius = 2;
    switch (seat) {
      case SeatState.None:
        return Container(
          margin: EdgeInsets.all(margin),
          width: size,
          height: size,
          color: Colors.transparent,
        );
      case SeatState.Available:
        return Container(
          margin: EdgeInsets.all(margin),
          width: size,
          height: size,
          decoration: BoxDecoration(
            border: Border.all(color: Colors.blue),
            borderRadius: BorderRadius.all(Radius.circular(radius)),
          ),
        );
      case SeatState.Reserved:
        return Container(
          margin: EdgeInsets.all(margin),
          width: size,
          height: size,
          decoration: BoxDecoration(
            borderRadius: BorderRadius.all(Radius.circular(radius)),
            color: Colors.blue,
          ),
        );
      case SeatState.Selected:
        return Container(
          margin: EdgeInsets.all(margin),
          width: size,
          height: size,
          decoration: BoxDecoration(
            borderRadius: BorderRadius.all(Radius.circular(radius)),
            color: Colors.purple,
          ),
        );
      default: throw ArgumentError();
    }
  }
}
Now it is time to wrap them up and visualize the Grid in our app. We get the seats’ sample, and map each of them to a specific box style:
class SeatsGrid extends StatelessWidget {
  final List<List<SeatState>> seats = getSampleSeats();

  @override
  Widget build(BuildContext context) {
    final rows = seats
        .map((columnsSeatState) => Row(
              children: makeColumns(columnsSeatState),
              mainAxisSize: MainAxisSize.min,
            ))
        .toList();

    return Column(
      mainAxisSize: MainAxisSize.min,
      children: rows,
    );
  }

  List<Widget> makeColumns(List<SeatState> seats) {
    return seats.map((seatState) => makeSeat(seatState)).toList();
  }
}
Okay, now we are done with the seats’ section (we just need to change the selected state with a check-mark image), you can try it out in DartPad.
The next step is to update the assets and combine our written widgets with other components of the design. As the other components are not challenging, I skip explaining them. You can check the final code.
I also added some fancy animation to our implementation. In this blog post, we do not focus on implementing these animations. But if you are interested in animations, let me know so that I write some blog posts about animations.
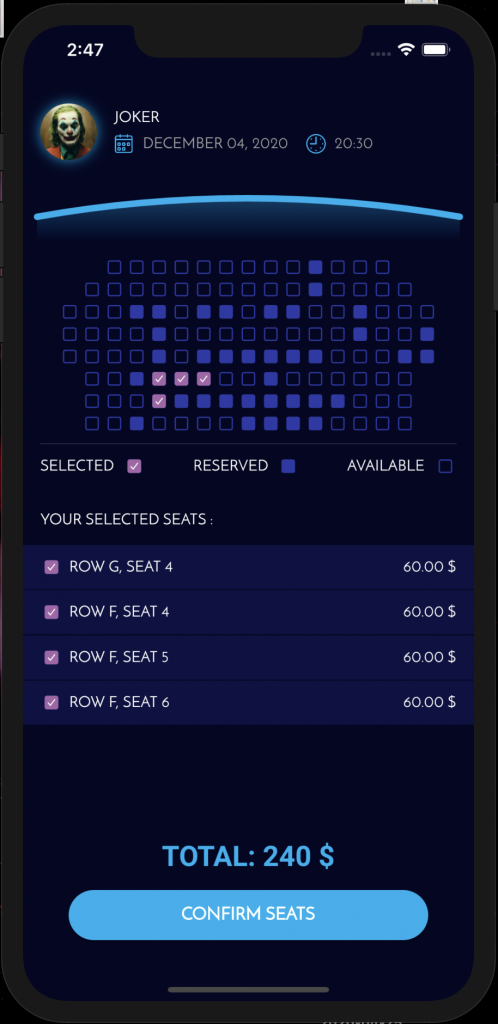
Our final result:
Check source code in the Github.
If you have any design suggestions to be implemented in further posts, send them via email ([email protected]).
Thanks!
Update:
You can now run it right now in your browser here.
Good job and thank you iman!
very nice, thank you
good job!
I’ve got impressed so much! You are really cool. Thanks for making me try this
Good Job.. Showwwwww
Outstanding bro, please keep it up, i also want to learn like that.
Sure, I will continue 🙂
Very impressive! Cool!